
If you’ve ever looked at your OPNsense box and thought, “this thing is barely breaking a sweat,” you’re not alone. Many users with overpowered hardware are now looking for ways to run virtual machines on OPNsense to take full advantage of those idle resources with additional software and services. In my case, I had 8GB of RAM and 120GB of storage sitting mostly idle, with CPU usage rarely spiking beyond a modest blip.
Instead of virtualizing OPNsense itself using something like Proxmox (which is a common suggestion), I wanted to keep OPNsense on bare metal for reliability and stability. But I also wanted to move some VMs directly onto my router box, such as my Ubuntu Server VM running the TP-Link Omada software that controls my WiFi. That led me down the rabbit hole of running a virtual machine on OPNsense—and the tool that makes this possible is bhyve, the native FreeBSD hypervisor.
This is definitely not officially supported and could break with any OPNsense update, so proceed with caution. My setup is loosely based on a 2023 forum post I found in the OPNsense community forums.
Step 1: Installing bhyve
To get bhyve running, we first need to enable the FreeBSD repository temporarily. OPNsense locks its package manager to prevent upgrades from mismatched repos, so we need to handle this carefully.
Lock the pkg tool
pkg lock -y pkgEnable the FreeBSD repository
sed -i '' 's/enabled: no/enabled: yes/' /usr/local/etc/pkg/repos/FreeBSD.confInstall bhyve and required packages
pkg install -y vm-bhyve grub2-bhyve bhyve-firmwareDisable the FreeBSD repository again
sed -i '' 's/enabled: yes/enabled: no/' /usr/local/etc/pkg/repos/FreeBSD.confUnlock pkg
pkg unlock -y pkg⚠️ Leaving the FreeBSD repo enabled may interfere with future OPNsense updates. Disabling it again helps maintain system stability, but means bhyve won’t update automatically. If you want to update bhyve later, you’ll need to repeat this process.
Step 2: Configuring the Firewall for Virtual Machines on OPNsense
Next, we need to create a virtual bridge to let our bhyve virtual machines talk to each other and the rest of the network.
This part is all done from the OPNsense UI.
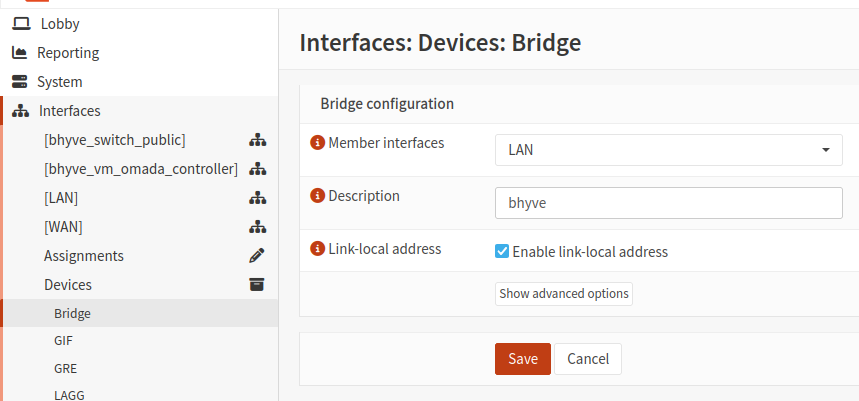
Create a bridge interface
- Navigate to Interfaces → Devices → Bridge
- Add a new bridge with your LAN interface as a member
- Enable link-local IPv6 if you use IPv6 on your network
- Note the name of your bridge (e.g.,
bridge0)
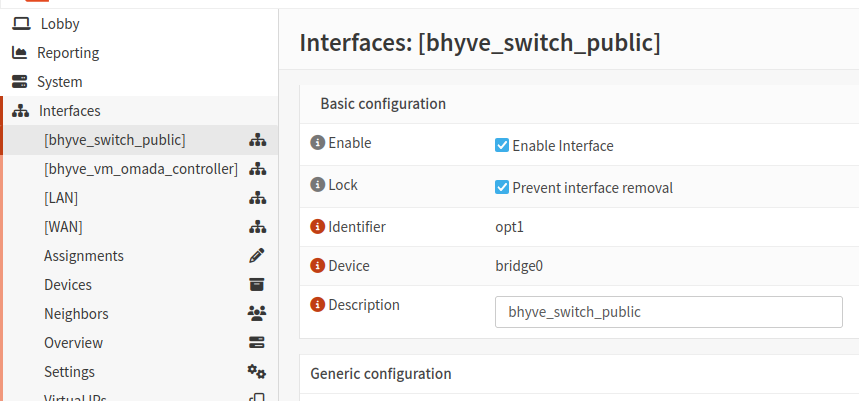
Assign and configure the bridge interface
- Go to Interfaces → Assignments
- Assign
bridge0to a new interface (give it a description likebhyve_switch_public) - Enable the interface
- Check Lock – Prevent interface removal to avoid losing it on reboot
Allow traffic through the bridge
- Navigate to Firewall → Rules → bhyve_switch_public
- Add a rule to allow all traffic (you can tighten this later if needed)
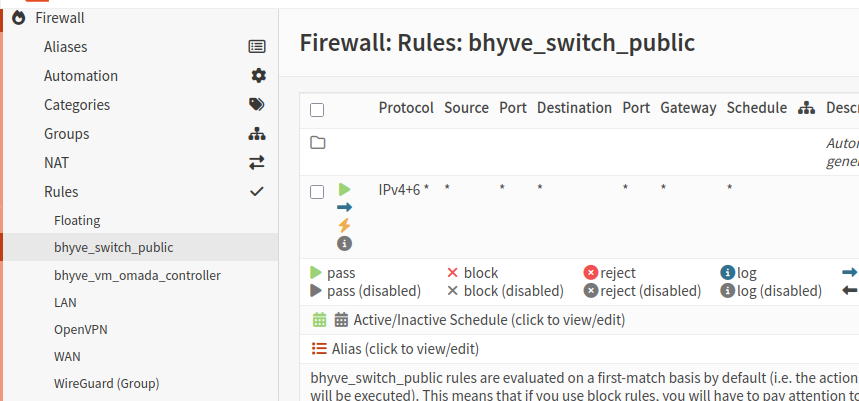
One thing to note: the forum post I referenced above did not mention anything about assigning an interface or adding a firewall rule for the bridge. However, in my experience, my virtual machines in OPNsense had no network connectivity until I completed both of these steps.
Step 3: Setting Up bhyve
With bhyve installed and your network bridge configured, the next step is to prepare the virtual machine manager and your storage directory. You have two options here: using ZFS (ideal for advanced snapshots and performance features) or a standard directory (simpler and perfectly fine for one or two VMs).
Option 1: Using ZFS for VM Storage
If you’re using ZFS (like zroot), create a dataset for your VMs:
zfs create zroot/bhyveThen enable and configure vm-bhyve:
sysrc vm_enable="YES"
sysrc vm_dir="zfs:zroot/bhyve"
vm init
Option 2: Using a Standard Directory
If you’re not using ZFS or want a simpler setup for running just a few virtual machines on OPNsense:
mkdir /bhyve
sysrc vm_enable="YES"
sysrc vm_dir="/bhyve"
vm init
This sets up /bhyve as the default VM storage directory. You’ll now be able to manage and create virtual machines using the vm command-line tool, with bhyve handling the hypervisor backend.
This is the option that I personally chose for my setup, since I only plan on running 1 or 2 VMs.
Step 4: Configuring bhyve
With the storage and base configuration out of the way, the next step is to configure networking for bhyve. To do this, we’ll create a virtual switch that connects bhyve’s virtual NICs to the bridge interface we created in Step 2.
Setting up Networking
Run the following command to create a manual switch that binds to the bridge0 interface:
vm switch create -t manual -b bridge0 publicThis tells vm-bhyve to create a virtual switch named public and associate it with bridge0, allowing your VMs to communicate with the rest of your network. Any virtual machine you create can now be attached to this switch to access LAN or internet resources just like any other device on your network.
Copying VM Templates
Before you start creating virtual machines in OPNsense, it’s helpful to copy the sample configuration templates that come with vm-bhyve. These templates make it easier to define virtual machines for different operating systems like FreeBSD, Linux, or Windows.
If you’re using ZFS and followed the zroot/bhyve setup as described in Option 1 above:
cp /usr/local/share/examples/vm-bhyve/* /zroot/bhyve/.templates/If you’re using a standard directory setup like /bhyve, as described in Option 2 above:
cp /usr/local/share/examples/vm-bhyve/* /bhyve/.templates/This copies example VM configuration templates into the .templates directory within your VM storage location. These templates provide base config files for creating new VMs and are a helpful starting point for most operating systems.
Step 5: Setting Up Your Virtual Machine
In this step, we’ll walk through creating your first VM using bhyve. Since there’s more to this than just launching a template, I’ve broken it down into three parts: setting up the VM itself (including creating a config), installing the operating system, and then configuring the firewall for the VM.
Configuring the VM
For my setup, I was creating an Ubuntu Server instance that runs TP-Link Omada controller software.
First, navigate into your templates directory. If you’re using ZFS, it’ll look like this:
cd /zroot/bhyve/.templates/Or if you’re using a regular directory setup:
cd /zroot/bhyve/.templates/Inside, you’ll find configuration files for different OS templates. I used the one for Ubuntu, found at ubuntu.conf, which contains the following:
loader="grub"
cpu=1
memory=512M
network0_type="virtio-net"
network0_switch="public"
disk0_type="virtio-blk"
disk0_name="disk0.img"
This basic config uses GRUB as the loader and allocates 1 CPU and 512MB of RAM. It attaches to the public switch we created earlier and uses a virtual block device for storage.
To create a custom config for my Omada controller VM, I simply copied the Ubuntu template:
cp ubuntu.conf omada-controller.confThis gave me a dedicated configuration file I could tweak without touching the original Ubuntu template.
Next, I edited the omada-controller.conf file using nano to better suit the needs of the Omada software:
nano omada-controller.confAnd the contents:
loader="uefi"
cpu=2
memory=3G
network0_type="virtio-net"
network0_switch="public"
disk0_type="virtio-blk"
disk0_name="disk0.img"
This configuration increases the resources available to the VM—allocating 2 CPU cores and 3GB of RAM, which is more appropriate for running the Omada controller software.
Initially, I tried using the GRUB loader as shown in the Ubuntu template, but I ran into problems booting the OS after installation. After doing some research, I found that this is a fairly common issue when using GRUB with certain Linux distributions on bhyve. Switching to uefi resolved the problem for me and allowed the VM to boot normally. Your mileage may vary, but if you’re stuck at boot, switching the loader to uefi is worth trying.
Starting Guest OS Installation
Before you can install the operating system, you’ll need to download and import the installation media (ISO file) for your OS into bhyve. This is easy to do with the vm iso command.
I downloaded the Ubuntu 22.04.5 server installer ISO using:
vm iso https://mirror.digitaloceans.dev/ubuntu-releases/22.04.5/ubuntu-22.04.5-live-server-amd64.isoThis downloaded the ISO file directly into the /bhyve/.iso directory (or /zroot/bhyve/.iso if you’re using ZFS).
Once the ISO was downloaded, I started the installation process for my VM using:
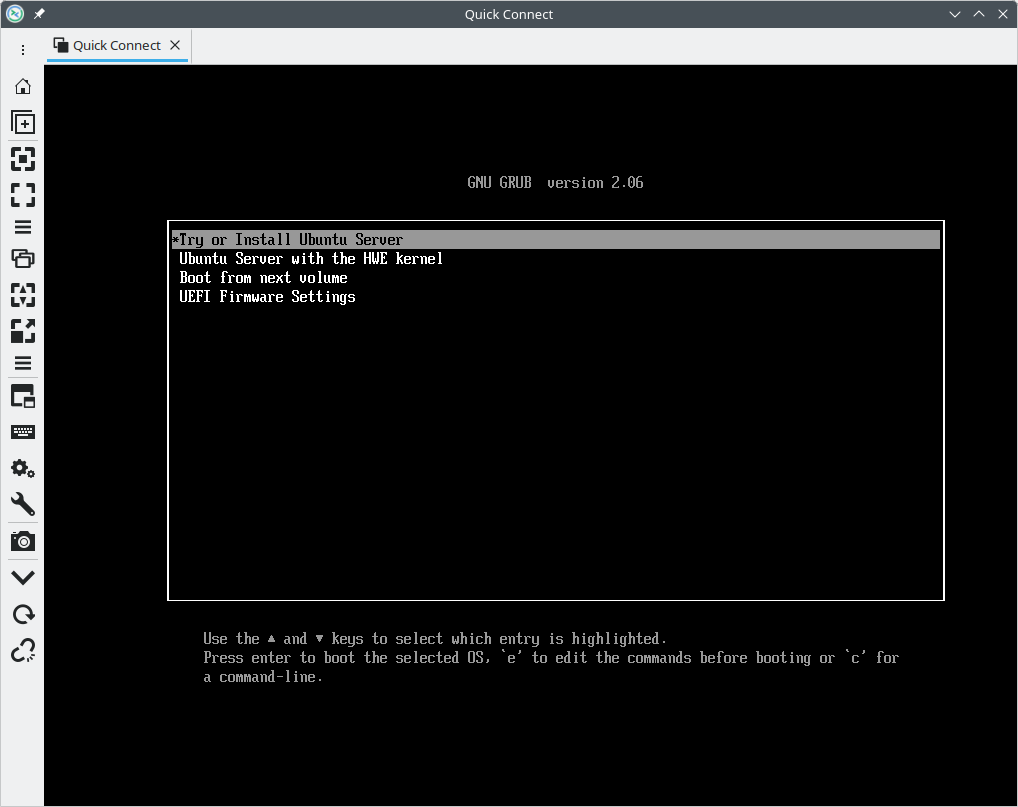
vm install -f omada-controller ubuntu-22.04.5-live-server-amd64.isoThis command tells vm-bhyve to boot the VM using the downloaded ISO so you can proceed with installing the operating system in console mode.
In my case, when using the GRUB loader, the console mode installer worked fine. However, after switching to UEFI mode, I ran into a problem where the console installer would no longer boot properly. After doing some research, I found that this is a common issue with bhyve when using UEFI.
To work around this, I edited my omada-controller.conf and temporarily added the following line to enable graphical output:
graphics="yes"The updated configuration file looked like this:
loader="uefi"
cpu=2
memory=3G
network0_type="virtio-net"
network0_switch="public"
disk0_type="virtio-blk"
disk0_name="disk0.img"
graphics="yes"
This allowed the ISO to boot into the graphical installer, which I accessed using VNC. After installation, I planned to enable SSH on the VM to manage it more easily and remove the graphics option.
However, to use VNC to complete the installation, I needed to add additional firewall rules to allow VNC access to the virtual machine after it was created and booted.
Step 6: Configuring the Firewall (Again)
When a bhyve virtual machine boots, it creates a new network interface on the host system, usually with the prefix tap. When my bhyve VM booted, the firewall blocked all network access on the new VM interface. As a result, I was unable to connect to the VM, and the VM itself had no network connectivity.
Here’s what I did to properly assign the VM network interface and open up traffic:
- Run
ifconfigfrom the console to see the list of interfaces. - Identify the new interface created by bhyve (it will usually start with
tap). In my case, it was namedtap0. - Rename the
tapinterface so it can be properly assigned in the OPNsense GUI:
ifconfig tap0 name bhyve0- Go to Interfaces → Assignments in the OPNsense UI.
- Assign the newly renamed
bhyve0interface. - Give it a description like
bhyve_vm_omada_controller. - Enable the interface.
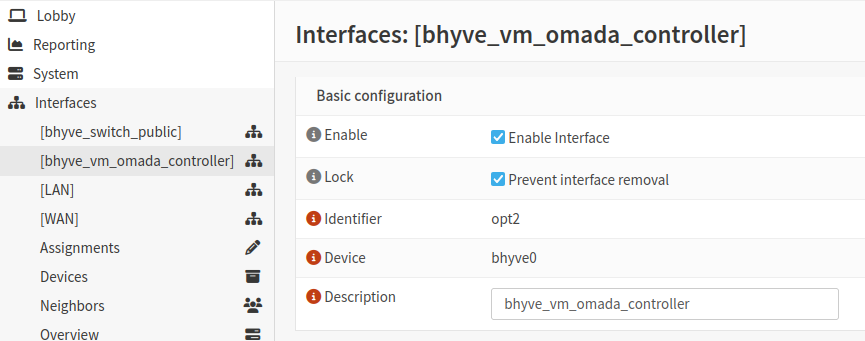
- Go to Firewall → Rules → [bhyve_vm_omada_controller].
- Add a rule to allow all traffic through the interface.
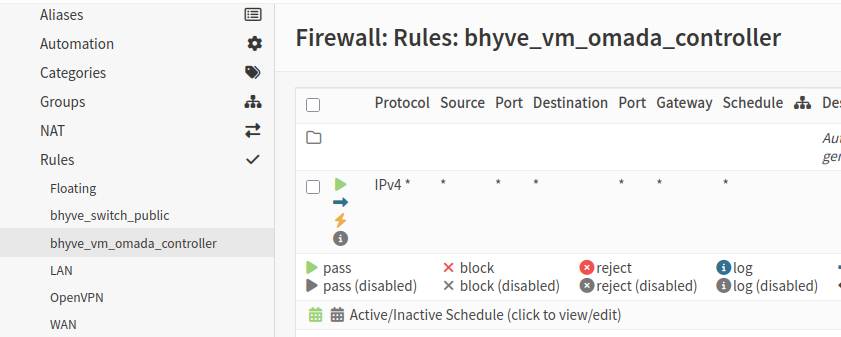
This setup ensured that the virtual machine had full network access through its own dedicated interface, while still keeping things clean and organized within OPNsense.
Keep in mind that each time the VM is powered off and started again, a new tap interface is created. Because of this, you must manually rename and reassign the interface every time the VM boots until we set up a persistent interface configuration after the OS installation is complete.
Keeping the interface name consistent between shutdowns so firewall rules apply correctly was one of the trickiest parts of the entire setup for me. I’ll dive deeper into the different solutions I tested, and what finally solved the issue reliably, in the final step of this article.
Step 7: Connecting with VNC and Installing the OS
Now that our virtual machine on OPNsense is configured, the ISO is loaded, and the firewall rules are in place, it’s time to connect to the VM and install the OS.
- Open your preferred VNC client. I personally used Remmina for this, but other popular options like TightVNC and TigerVNC will also work fine.
- Connect to your OPNsense router’s IP address on port 5900.
- You should see your OS installer’s screen boot up!
Proceed through the guest OS installation like you normally would. During installation, I made sure to:
- Enable the OpenSSH server in Ubuntu so I could manage the VM over SSH instead of VNC afterward.
- Configure the VM with a static IP address within my LAN subnet.
Once installation was completed, I rebooted the VM. If you enabled SSH, you should now be able to connect to your VM via its IP address without needing to rely on VNC anymore.
After confirming SSH access, I edited the VM’s configuration to remove the graphics="yes" line from omada-controller.conf for security and resource efficiency.
After powering off the VM to make these changes, I had to manually rename the network adapter again following the steps from Step 6, before I could access it via SSH.
Now let’s configure the VM to start automatically at boot, and find a more permanent solution for the network adapter issue in the next step.
Step 8: Starting the VM at Boot and Fixing the Network Interface Name Issue
Starting the VM at Boot
By default, bhyve VMs don’t start automatically with the system. You can set individual VMs to start using:
vm set omada-controller boot=onHowever, there’s a more flexible method that allows you to define a list of VMs that should start at boot. I used the following command to specify mine:
sysrc vm_list="omada-controller"This ensures vm-bhyve starts the omada-controller VM whenever the system boots.
If you want to start multiple VMs, just list them separated by spaces:
sysrc vm_list="omada-controller another-vm some-other-vm"This is useful if you plan to run multiple VMs on your OPNsense machine via bhyve.
Fixing the Networking Interface Name at Boot
One of the trickiest parts of my setup was keeping the VM’s network interface name consistent between reboots. I initially tried using the following line in my VM config:
network0_name="bhyve0"This is supposed to create the VM’s network interface with the name bhyve0 when it boots.
However, I found that while this approach worked with loader="grub" in the VM config (BIOS mode), it caused the VM to crash immediately at startup when using loader="uefi".
Instead, I leaned into ifconfig and ran the following:
sysrc ifconfig_tap0_name="bhyve0"This ensures the tap0 interface is automatically renamed to bhyve0 at boot time, which seems to be working well for me. This seems to allow the firewall rules we created earlier to be applied successfully without manual intervention.
Now we have configured our VM to start running at boot, and we automatically rename the created network interface at boot.
Keep in mind that with the ifconfig method, you will have to manually run ifconfig again if the VM is powered off and on, but the OPNsense host is not:
ifconfig tap0 name bhyve0This is because the interface gets destroyed and recreated with the default tap0 name.
Running Virtual Machines on OPNsense: My Final Thoughts
Running virtual machines directly on OPNsense using bhyve is an advanced but rewarding undertaking. It allows you to consolidate infrastructure and put underutilized hardware to work, all while keeping your firewall on bare metal for maximum reliability. While the process involves a lot of manual setup—especially around networking and boot configuration—it ultimately gives you a lightweight, headless VM host tightly integrated into your router.
Just remember that this is an unofficial and unsupported use case. Updates to OPNsense or FreeBSD may break things, so keep good backups and approach with a tinkerer’s mindset. But if you’re comfortable on the command line and like squeezing every drop of utility out of your hardware, this setup is a powerful way to do just that.
Remarks
vm listis a good command to help see loaded VMs and their status. You can also start and stop VMs withvm start vm-nameandvm stop vm-name.- You will have to configure the network adapter settings for each VM you create and apply the firewall rules for each VM in the OPNsense UI as we did above.
- It’s important to note the configuration differences between using the UEFI loader and the BIOS loader when setting up virtual machines on OPNsense, as stated throughout the article.
- To see a sample VM configuration, you can take a look at an example on GitHub here.
- Again, this is all unsupported. Follow at your own risk.
- This is for advanced users only. None of it is manageable through the OPNsense UI, except firewall rules. Know what you’re doing in the terminal before following this guide.


Leave a Reply