If you’re setting up a virtual machine with a QCOW2 image in Proxmox, you might feel overwhelmed at first. However, understanding the steps can make it a manageable task. This guide will explain how to import a QCOW2 image into Proxmox, including uploading the file using SFTP via the command line.
Working with QCOW2 in Proxmox setups involves a few terminal commands and some configuration in the Proxmox web interface, but it’s straightforward once you’ve done it once.
Steps to Import a QCOW2 Image in Proxmox
1. Access Your Proxmox Terminal
Log in to the terminal of your Proxmox host. This can be done directly or via SSH. The terminal is essential for transferring and managing files during the setup process.
2. Prepare the QCOW2 Storage Directory
Store QCOW2 images in a dedicated directory for better organization. Proxmox doesn’t create this directory by default, so you may need to set it up. A good place to store QCOW2 images is in /var/lib/vz/template/qcow.
- Check if the directory exists:
ls /var/lib/vz/template/qcow - If it doesn’t exist, create it:
mkdir -p /var/lib/vz/template/qcow
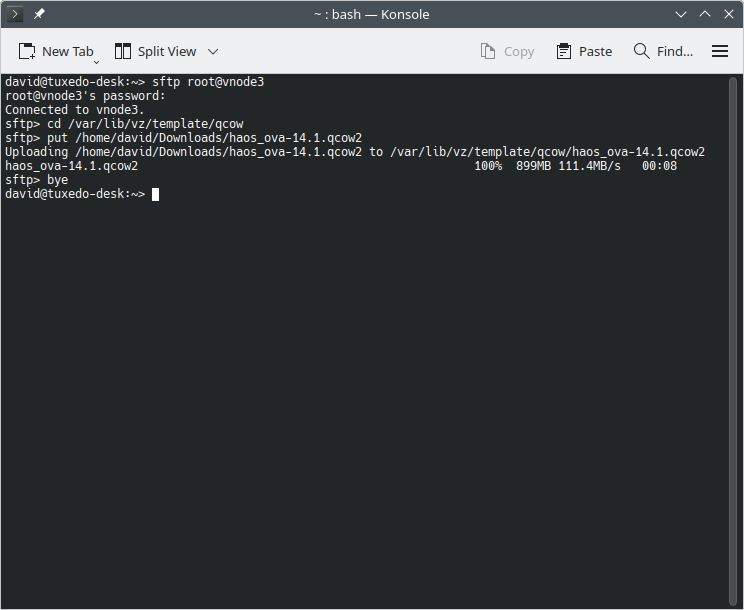
3. Upload the QCOW2 Image Using SFTP
Uploading the QCOW2 image requires an SFTP connection. Here’s how to do it using the command line:
- Open a terminal on your local machine.
- Use the
sftpcommand to connect to your Proxmox host. Replaceuserwith your Proxmox username andhostwith the IP address of your Proxmox server:sftp user@host - Navigate to the directory where you want to upload the image:
cd /var/lib/vz/template/qcow - Upload the QCOW2 file from your local system:
put /path/to/your_image.qcow2
Replace/path/to/your_image.qcow2with the actual path to the QCOW2 file on your local machine. - Exit the SFTP session with
bye.
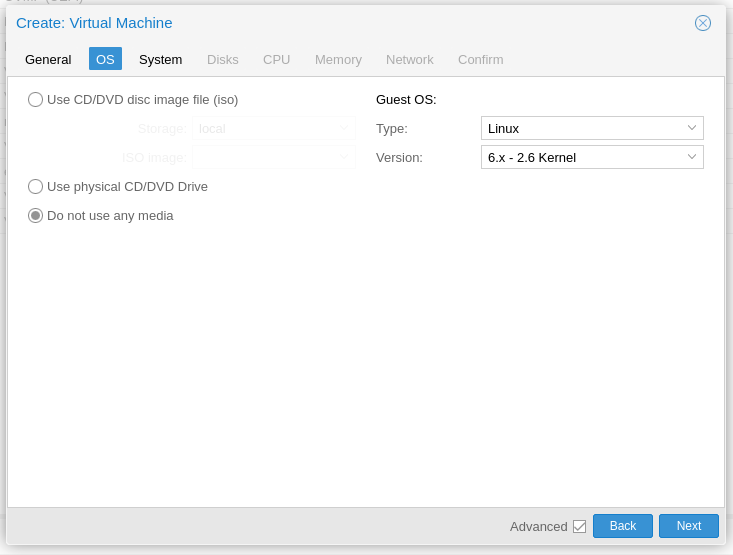
4. Create a New Virtual Machine
Now, create a VM in Proxmox using the web interface:
- Log in to the Proxmox web interface.
- Select
Create VMand configure the basic settings, such as the name and operating system. Make sure to selectDo not use any mediaon theOStab. - On the
Diskstab, leave all settings at their default values:- The default settings work because QCOW2 images already define their initial drive size. If needed, you can expand the drive size later.
- Select any bus type for now, as you will replace this with the QCOW2 disk.
5. Import the QCOW2 Image
After creating the VM, use the qm importdisk command to import the QCOW2 image to the VM.
- Identify the VM’s ID from the Proxmox web interface (e.g., 120).
- Run the following command in the Proxmox terminal:
qm importdisk 120 /var/lib/vz/template/qcow/your_image.qcow2 local
This imports the QCOW2 image as an unused disk linked to the VM.
Make sure to replace the VM ID, image location and storage name with the values for your system.
Here is a sample output from the command:
importing disk '/var/lib/vz/template/qcow/haos_ova-14.1.qcow2' to VM 120 ...
transferred 0.0 B of 32.0 GiB (0.00%)
transferred 396.5 MiB of 32.0 GiB (1.21%)
transferred 737.3 MiB of 32.0 GiB (2.25%)
transferred 1.1 GiB of 32.0 GiB (3.36%)
transferred 1.4 GiB of 32.0 GiB (4.47%)
transferred 1.8 GiB of 32.0 GiB (5.59%)
transferred 2.1 GiB of 32.0 GiB (6.70%)
transferred 2.5 GiB of 32.0 GiB (7.81%)
transferred 2.9 GiB of 32.0 GiB (8.92%)
...
transferred 20.9 GiB of 32.0 GiB (65.44%)
transferred 21.3 GiB of 32.0 GiB (66.56%)
transferred 21.7 GiB of 32.0 GiB (67.67%)
transferred 22.0 GiB of 32.0 GiB (68.78%)
transferred 22.4 GiB of 32.0 GiB (69.89%)
transferred 22.7 GiB of 32.0 GiB (71.01%)
transferred 32.0 GiB of 32.0 GiB (100.00%)
unused0: successfully imported disk 'VMs:vm-120-disk-3'
In this case, this created a new 32.0 GiB drive specified by our image that we can attach to our VM.
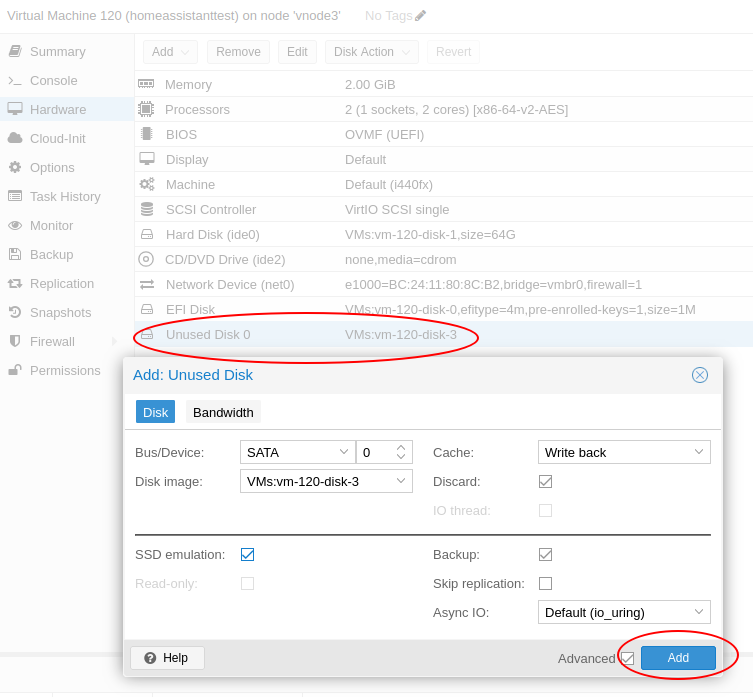
6. Attach the Disk to the VM
Once imported, attach the QCOW2 image to the VM:
- In the Proxmox web interface, go to the VM and select
Hardware. - Find the unused disk and attach it as a VirtIO Block Device or a SATA device (if your guest OS doesn’t support QEMU agent and VirtIO drivers).
- Optionally, remove or detach the original disk created during VM setup if it’s no longer needed.
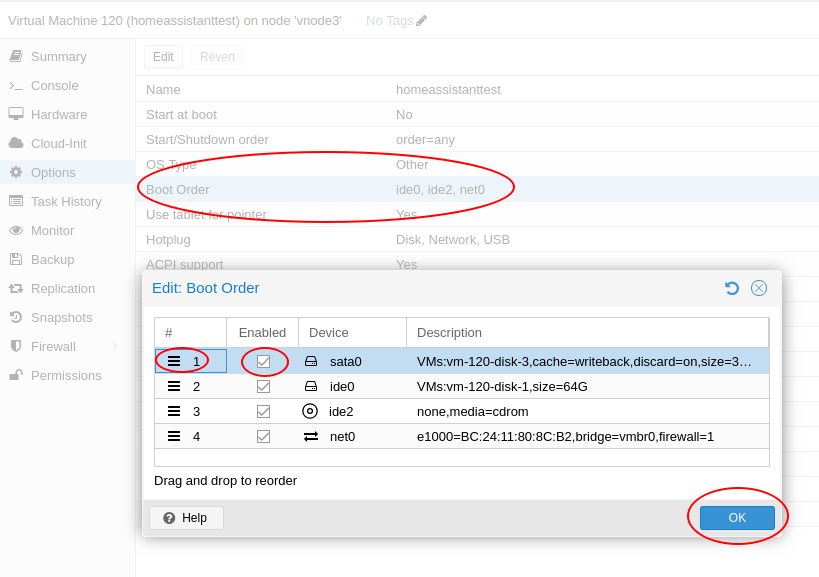
7. Update the Boot Order
Ensure the VM boots from the newly attached QCOW2 image:
- Go to the
Optionstab in the VM’s settings. - Set the newly attached VirtIO disk as the primary boot device.
8. Start the VM
Boot up the VM. If everything is set up correctly, the system should load from the QCOW2 image!
Remarks
- When creating the VM, default disk settings are sufficient since the QCOW2 image specifies its own initial drive size. You can expand the size later if needed.
- The
sftpcommand is a straightforward way to upload the QCOW2 file. If you prefer a graphical interface, tools like FileZilla can achieve the same result. - Use the
/var/lib/vz/template/qcowdirectory to keep QCOW2 images organized and accessible for future use. You can use any directory, but this is an easy place to remember since it’s with other templates. - You can also use any other method to upload your QCOW2 images to this directory, or even download them to this directory directly with a tool such as
wget.


Leave a Reply