When I added an Intel Arc GPU to my Proxmox server for Plex hardware transcoding, I quickly realized there isn’t much solid documentation on how to properly passthrough a GPU to a Proxmox LXC container. Most guides focus on VMs, not LXCs. After some trial and error, I figured out a process that works. These same steps can also apply if you’re running Jellyfin inside an LXC.
In this guide, I’ll walk you through enabling GPU passthrough in Proxmox (or Jellyfin) LXC step by step.
Step 1: Enabling PCI(e) Passthrough in Proxmox
The first step is enabling PCI passthrough at the Proxmox host level. I mostly followed the official documentation here: Proxmox PCI Passthrough Wiki.
I’ll summarize what should be done below.
Enable IOMMU in BIOS
Before you continue, enable IOMMU (Intel VT-d / AMD-Vi) in your system’s BIOS. This setting lets GPUs pass directly through to containers or VMs.
Each BIOS Is different, so if you’re not sure you should check your motherboard’s instruction manual.
Enable IOMMU Passthrough Mode
Not all hardware supports IOMMU passthrough, but if yours does you’ll see a big performance boost. Even if your system doesn’t, enabling it won’t cause problems, so it’s worth turning on.
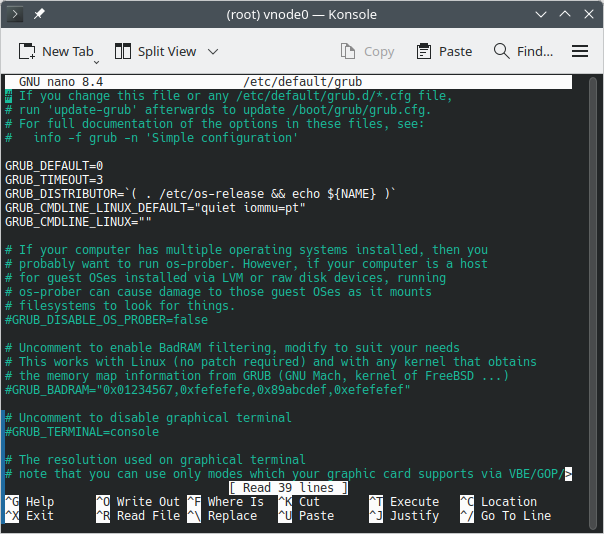
Edit the GRUB configuration with:
nano /etc/default/grubLocate the GRUB_CMDLINE_LINUX_DEFAULT line and add:
iommu=ptIntel vs AMD Notes
- On Intel CPUs with Proxmox older than v9 (kernel <6.8), also add:
intel_iommu=on - On AMD CPUs, IOMMU is enabled by default.
- On Intel CPUs with kernel 6.8 or newer (Proxmox 8 updated or Proxmox 9+), you don’t need the
intel_iommu=onparameter.
With an AMD CPU on Proxmox 9, my file looked like this in the end:
Save the file by typing CTRL+X, typing Y to confirm and then Enter to save.
Then update grub by running:
update-grubLoad VFIO Kernel Modules
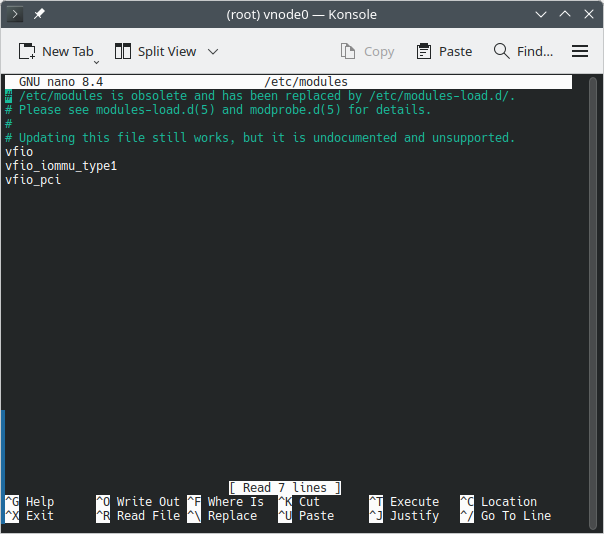
Next, we need to load the VFIO modules so the GPU can be bound for passthrough. Edit the modules file with:
nano /etc/modulesAdd the following lines:
vfio
vfio_iommu_type1
vfio_pci
My file looked like this in the end:
Save and exit, then update initramfs:
update-initramfs -u -k allReboot and Verify
Reboot your Proxmox host and verify the modules are loaded:
lsmod | grep vfioYou should see the vfio modules listed. This is what my output looks like:
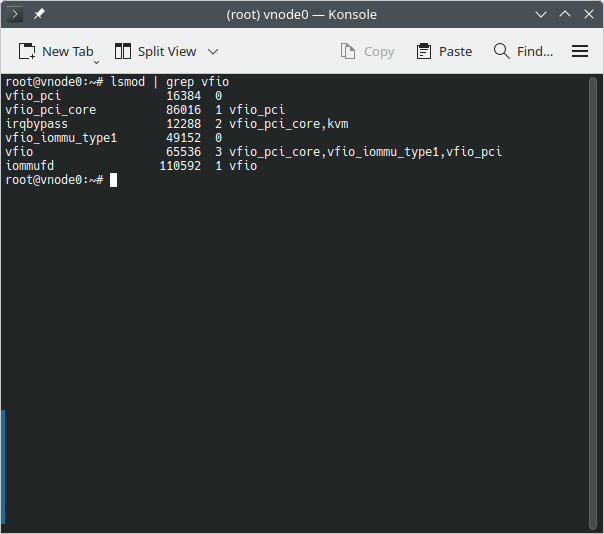
If you don’t get any output, the kernel modules have not loaded correctly and you probably forgot to run the update-initramfs command above.
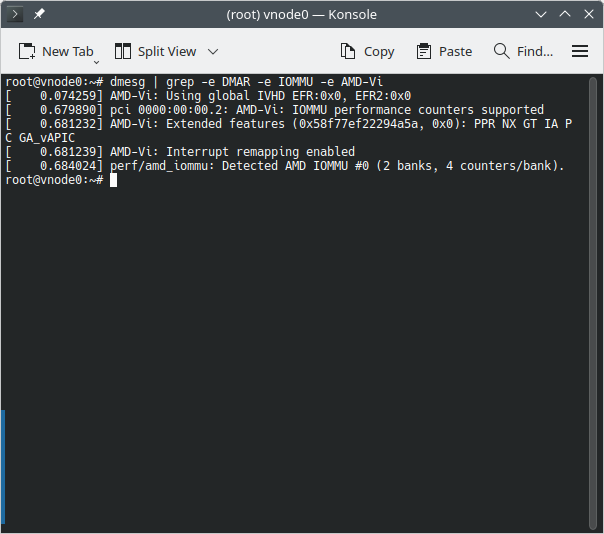
To double-check IOMMU is active, run:
dmesg | grep -e DMAR -e IOMMU -e AMD-ViDepending on your hardware, you should see confirmation that IOMMU or Directed I/O is enabled:
Step 2: Finding the GPU Renderer Device Path
Now that PCI passthrough support is enabled, the next step is to figure out the device path of the renderer for the GPU you want to pass through.
Run the following on your Proxmox host:
ls /dev/driThis will print all the detected GPUs. For example, my output looked like this:
by-path card0 card1 renderD128 renderD129If you only have a single GPU, you can usually assume it will be something like renderD128. But if you have multiple GPUs (as I did), you’ll need to identify which renderer belongs to your Intel Arc card.
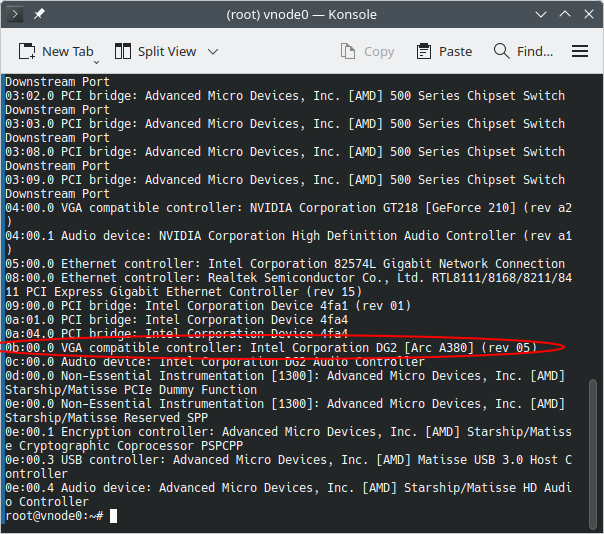
First, run:
lspciThis will list all PCI devices. From there, I found my Intel Arc GPU at 0b:00.0:
Next, run:
ls -l /dev/dri/by-path/My output looked like this:
lrwxrwxrwx 1 root root  8 Aug 24 11:54 pci-0000:04:00.0-card -> ../card0
lrwxrwxrwx 1 root root 13 Aug 24 11:54 pci-0000:04:00.0-render -> ../renderD129
lrwxrwxrwx 1 root root  8 Aug 24 11:54 pci-0000:0b:00.0-card -> ../card1
lrwxrwxrwx 1 root root 13 Aug 24 11:54 pci-0000:0b:00.0-render -> ../renderD128
From this, I confirmed that my Intel Arc GPU was associated with renderD128. That means the full device path I need to pass to my LXC container is:
/dev/dri/renderD128Step 3: Passthrough GPU Device to the Plex LXC Container
Now that we know the correct device path, we can pass it through to the LXC container.
- Stop the container you want to pass the GPU into.
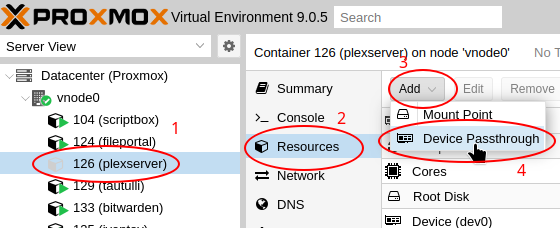
- In the Proxmox web UI, select your Plex LXC container.
- Go to Resources.
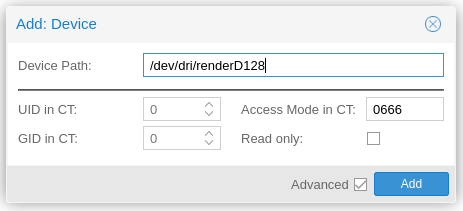
- At the top, click Add → Device Passthrough.

- In the popup, set Device Path to the GPU renderer path you identified in Step 2 (in my case,
/dev/dri/renderD128). - In the Access mode in CT field, type:
0666
- Click Add.
- Once added, you can start the container again.
A Note About Permissions
Normally, you would configure a proper UID or GID in CT for the render group inside the container so only that group has access. However, in my testing I wasn’t able to get the GPU working correctly with that method.
Using 0666 permissions allows read/write access for everyone. Since this is a GPU device node and not a directory containing files, I’m not too concerned, but it’s worth noting for anyone who takes their Linux permissions very seriously.
Step 4: Installing GPU Drivers Inside the LXC Container
With the GPU device passed through, the container now needs the proper drivers installed. This step varies depending on the Linux distribution you’re running inside the container.
Some distros may already include GPU drivers by default. But if you reach Step 5 and don’t see your GPU as an option in Plex (or Jellyfin), chances are you’re missing the driver inside your container.
In my case, I’m using a Debian container, which does not include Intel Arc drivers by default. Here’s what I did:
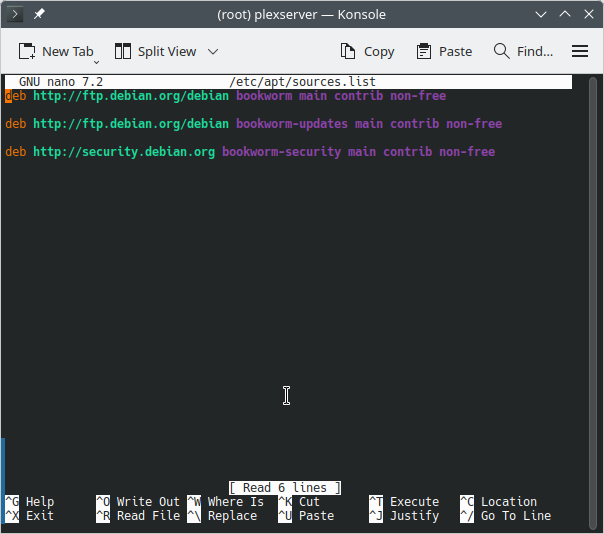
- Edit your apt sources to enable the non-free repo:
nano /etc/apt/sources.list - Add
non-freeto the end of each Debian repository line: - Refresh apt sources:
apt update - Install the Intel Arc driver package:
apt install intel-media-va-driver-non-free - Restart the container.
For Debian, I followed the official documentation here: Debian Hardware Video Acceleration Wiki.
Note: These steps will vary depending on your GPU make, model and container distribution. Make sure to check the official documentation for your hardware and distro.
Step 5: Enabling Hardware Rendering in Plex
Now that your GPU and drivers are ready, the final step is to enable hardware transcoding inside Plex.
- Open the Plex Web UI.
- Go to Settings (top-right corner).
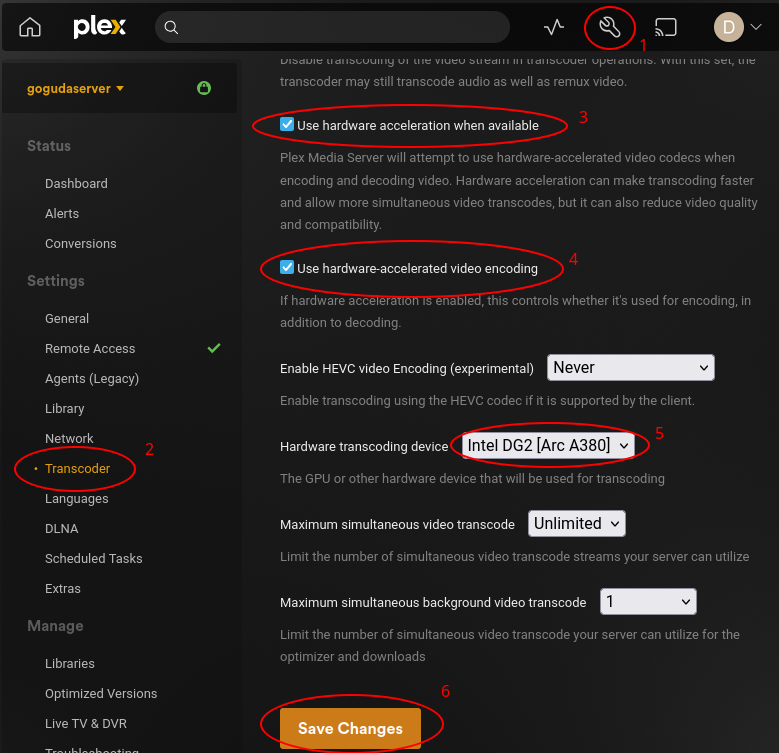
- In the left sidebar, scroll down and click Transcoder under Settings.
- Make sure the following options are checked:
- Use hardware acceleration when available
- Use hardware-accelerated video encoding
- Under Hardware transcoding device, you should now see your GPU. If not, double-check Step 4. In my case, it showed up as
Intel DG2 [Arc A380] - Select your GPU and click Save Changes.
Testing Hardware Transcoding
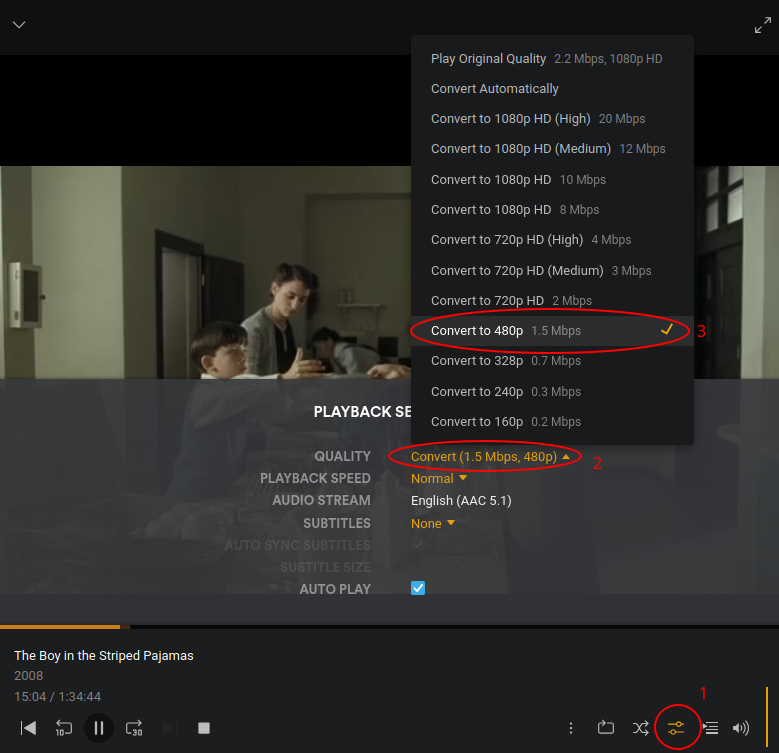
To verify that hardware transcoding is working:
- Play back any movie or TV show.
- In the playback settings, change the quality to a lower resolution that forces Plex to transcode:
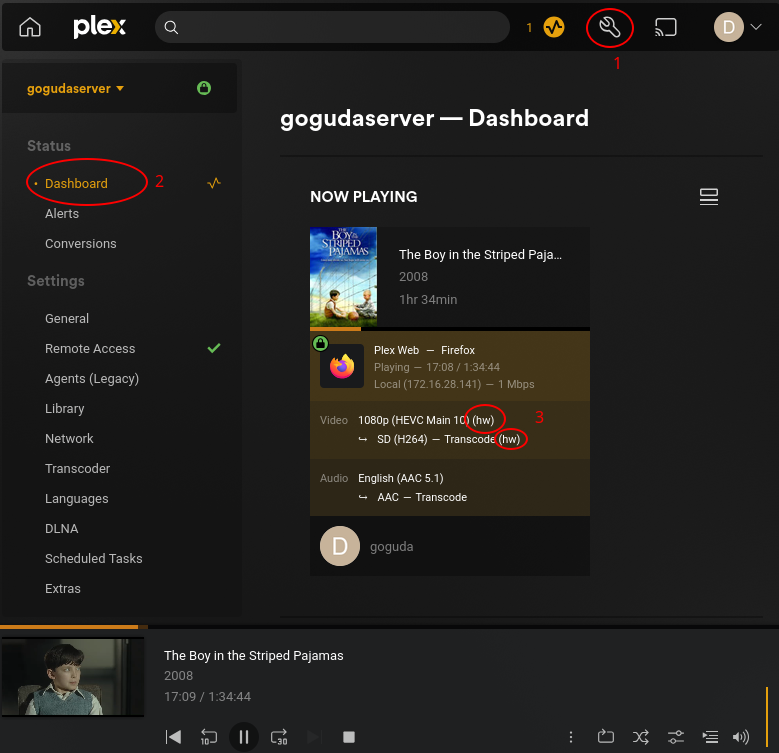
- While it’s playing, go to Settings → Dashboard.
- If the GPU is handling transcoding, you’ll see
(hw)beside the stream being transcoded:
That’s it! You’ve successfully set up GPU passthrough in Proxmox LXC for Plex. These same steps should also work for Jellyfin with minor adjustments for the Jellyfin UI.


Leave a Reply